
Welcome to this weeks post! I received two different votes for post topics to cover this week so I chose between the two and this is the result. This week I’m switching things up a bit and writing a guide vs. an adventure summary. This will be a behind the scenes look at how we car camp while on adventures. Each person’s set up will vary but there are common components of each set up, so if you’re new to car camping or looking for ideas for your own camping setup read on!
Below you’ll read about each section that we outfit with camping gear and household items. The sections are based on ordinary rooms in a house that satisfy the general needs we have as humans to be comfortable: sleep, food, water, toilet, and lastly your personal, recreation, and miscellaneous items. As a car camper you can outfit each section with either very basic items that you find at home, car camping specific items, or a combination of the two. Now to a detailed account of each section!
Sleep

For me, this is the most important section of our car. It has varied quite a bit since I first started car camping on my own when I was 18. My old set up was a single person tent with a 2.5 inch Thermarest sleeping pad with the occasional use of a hammock instead. This is a perfectly fine set up, but there are so many other options that can be more comfortable, easier to set up, or more luxury. Depending on your car and budget, you have many options for your sleeping arrangement.
In New Zealand our setup was a cheap four person tent and a cheap queen blowup mattress with a manual pump. In Flagstaff for awhile it was a simple wooden bed frame Jay constructed that had a 2 inch foam pad and a 2 inch memory foam pad. The main issue we had with this was that our Subaru Crosstrek didn’t have good clearance inside so it was a bit of a pain to get into the bed space and we were unable to sit up. Our current set up is closest to our New Zealand set up but has a few differences. Currently Jay is on his own pad and sleeps in his single person tent while I’ve been using a rented 2 person tent to fit my Exped Megamat (air plus foam, so comfortable!) and occasionally just sleep in the car on the bed frame with my mat. Eventually we’re going to get a 4 person tent and just sleep on our own sleeping pads, but we’ve been procrastinating and haven’t chosen one yet.
A more expensive option is rooftop tents. This of course also requires that you have a roof rack and after rack and tent you can end up paying upwards of $1500. If you are completely new to car camping or even camping in general and don’t have any camping gear- sleeping pad and tent- I suggest doing what we did in New Zealand and buy a cheap 2 or 4 person tent and a twin, full, or queen blow up mattress. If you have a high inside clearance vehicle that has a flat enough back, then by all means try sleeping inside. It can get complicated though if you don’t have a cargo box or lifted frame since you’ll have to move your other car camping items around each night.
Regarding bedding, you can either have a sleeping bag- which tends to be the warmest option for off season and winter camping since it traps in your body heat- or sheets and blankets. If you do go the sheets and blankets route I suggest using flannel sheets for off season along with a down comforter and fleece blanket. For summer you’ll probably be fine with just sheets and fleece or a 35 degree sleeping bag- good to still go low just in case you end up having cool nights in the summer. For pillows either have your comfy regular sized pillow, camping compact pillow, or piece of clothing wrapped around other clothing for the make-shift pillow. Our bedding tends to either live in our boxes or in mesh bags that sit on top of the boxes.
Food

Food! I won’t speak of the food itself since everyone has different diets, but later on I plan on doing another guide for healthy meals while car camping, so look out for that! Our kitchen setup is still evolving in efficiency, but has certain components that remain the same: heating/cooking element, kitchenware, washing station and cleaning, table and chair, and food storage.
The heating and cooking element for us currently is a Camp Chef two burner stove that hooks up to a 5 pound propane tank. In the beginning of our camping journey we just used our MSR Pocket Rocket that screws on to an isobutane and propane blended pressurized fuel canister. This was easy because it could also be used for backpacking but was not very stable or effective in cooking more complex meals. A cheap option is buying a single or two burner stove that runs on butane or small propane canisters, and this is what I suggest for new car campers.
Kitchenware is pretty straight forward and again can either be made up of kitchenware specific to camping or non breakable kitchenware items from home. The cheapest option would be plastic or metal plates, cups, and utensils. We bring a simple steel and old pot from home and either our cast iron frying pan or griddle that fits on our camping stove. I don’t suggest using a cast iron on a Pocket Rocket type stove but it would work fine on the other burner type stoves, or you can just have a simple frying pan.
Our washing station is still evolving and currently consists of a Sea to Summit stuff sack style washing basin, biodegradable soap, sponge, strainer, and water. The basin right now really just holds the dirty dishes until we get home or until we take some biodegradable soap to scrub and then rinse them because it takes too much water to hold it self up on its own without collapsing. An important thing to have though is some sort of mesh strainer to strain all the dirty dish water so that you’re not dumping food scraps around the campsite that will inevitably attract animals. If you do not have a strainer or happen to forget one, I suggest wiping off the food as best you can with a paper towel.
This leads me to trash. ALWAYS bring your own trash bags. I suggest small supermarket ones so that you don’t always have to be opening up the large smelly bag you’ve been using for several days. Also have either a bag or box for recyclable items. For cleaning supplies I suggest having a designated tote bag or bin that has an all purpose spray, sponges, biodegradable soap, paper towel, hand towel, and any other cleaning supplies you think you’ll need. For eating we recently have gotten a multi height table that either is tall for cooking or can go shorter and sit in front of our Kelty Loveseat chair. It’s not necessary to have these two items but it is very convenient for when you are disperse camping or a camping area does not have a picnic table.
Food storage is very important no matter where you go. Some places have more risk of bears, but no matter what it is important not to have food in your tent. Having it in your tent attracts a bear right to you. We put our dry food in ammo cans that latch tightly and probably can’t be broken into by a bear so we feel safe having it outside of the car at night. We do have a soft sided cooler that gets left in the car, but if you are in a designated camping area that is frequented by bears, there most likely will be a bear box that should be used.
Items such as kitchenware, cleaning supplies bag, and cooking stove all neatly pack into a tote box from home depot so that we can easily just take that out of the car when meal time rolls around. Organization is key since you’re dealing with a confined space. It sucks when you need something and realize it’s buried under a bunch of stuff, or you have no idea where it is altogether because nothing is organized.
Water

Depending on where you’re camping, water can either be all around you or really hard to come by. It’s always important to be prepared though, no matter how easily accessible water is. Jay and I have a 5 gallon water container that we fill up at home with the extension faucet, otherwise it would be pretty hard to fill.
We mainly rely on this for water but do bring camelbacks, water bottles, and water filter systems in case we end up somewhere where we can’t refill the container or need to purify the water. Our favorite water filter system is the sawyer mini which can be inserted into a camelback or other brand of similar type by cutting the tube. We have another tube or camelback for when we’re not filtering the water. Other water filters are good as well such as the squeeze and push pump styles or even the tablets.
The 5 gallon water container lives in the foot well of the back seat while the bottles, camelbacks, and water filters live in our personal items boxes.
Toilet

Similar to water, you never know whether there will be a toilet near by! In many places it is generally okay to dig a 6 inch deep and 4 inch round hole with a trowel to do your business. If you do decide to do this, make sure you are at least 200 feet from a water source, and ideally your spot should be in the sun because this makes it decompose faster.
However, in the desert and certain areas this matter does not decompose as well and it can be really hard to dig in compact sand anyways. It’s also not always the best idea to dig your own hole when you’re in a very frequented area so as not to impact the environment further. In these situations it’s a good idea to have “wag bags” that have a chemical powder that make it okay to be tossed in the trash after doing your business. I recommend no matter what to bring wag bags, using them means less impact on the environment you’re staying at and follows the leave no trace principles more closely.
Always make sure you have plenty of toilet paper, hand sanitizer, anti-bacterial soap, trowel, wag bags, and separate trash bags for toilet paper. All of the toilet related items should be in a separate area or box than food or personal items. As most people know, peeing anywhere really is fine, just don’t leave toilet paper in the woods!
Personal, Recreation, and Miscellaneous Items

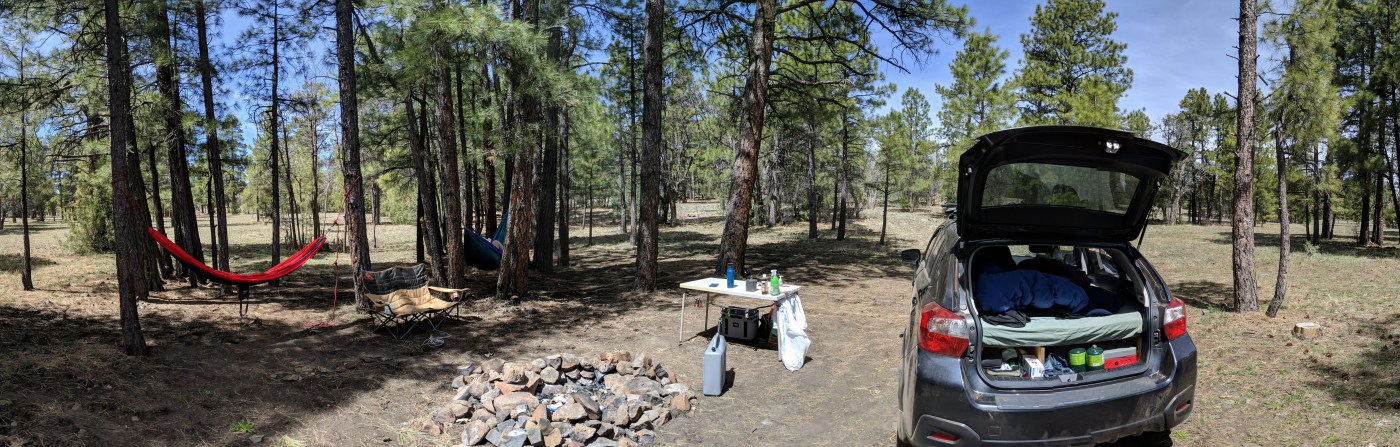
As seen in the above photo, we have our own boxes that hold our clothing, toiletries, several pillows for me (I sleep with 3 now for extra support due to my neck and shoulder injuries), books, and electronics. Obviously some personal items are in the car compartments, but the bulk of our items stay in the bins to keep things organized. As mentioned in the sleeping section, my bedding lives on top of my box while Jay’s lives in his box since he just has his sleeping bag, fleece blanket, and compact pillow while I have a comforter, 3 pillows, fleece blanket, and summer sleeping bag- I get cold!
Regarding recreation and miscellaneous items we have a separate bag that has an extra first aid kit, Frisbee, deck of cards, leather gloves, and other random items we might need. We also have our day hiking backpacks that have first aid kits and sunscreen.
That’s it!

I believe I’ve covered everything involving our car camping set up. I didn’t mention camp fires because we often can’t have one out west due to fire bans, but when you can you just have to buy fire wood- don’t do your own cutting, using dead on the ground wood is sometimes fine- and use dead on the ground sticks or cardboard to start a fire in a designated fire pit.
There are so many ways to setup your car for car camping but I hope that my guide has given you some new ideas or given you something to kick start your own car camping setup! If you have any questions regarding this guide or anything in it you think might need editing please contact me either by commenting on this post, Facebook messaging on our page, Instagram DM, or using one of the methods in the contact section of the website. Next week I’ll be doing another guide but this time for solo female backpacking. See you next week!
Mahalo and Kia Ora!
